Friday, February 29, 2008
less than productive
I have several "almost done" projects screaming at me to finish them. However the baby is teething and just this side of miserable. For the past several days he has had a fever, produced and impressive amount of drool and snot, has had a hard time nursing and been virtually inconsolable. After being up all night... he finally went down for a long nap this afternoon and actually woke up a bit like his old self. He is smiling and since I am typing this message, it should be obvious that he has allowed me to put him down for a short stretch of time. He is normally the happiest and easiest baby around but this teething thing has really thrown him all out of sorts. And what does he have to show for it... well, my once toothless wonder now has 2 (yes 2 erupted at the same time) new shiny teeth. Oh and did I mention that they are sharp and he bites! I am hoping to get some work done tomorrow but as many of you know... the world stops when the kids are sick.
Tuesday, February 26, 2008
a new look
I just got this fabulous new banner for my Etsy shop from Thompson Designs ... they have so many great banner designs to choose from and other art work too. So stop by and check out the new look. Also stop by Thompson Designs and tell them girl boxmaker sent you!

Sunday, February 24, 2008
check out what's new
So here is a little bit of what I have been working on. I had a few commissions to work on this weekend but I was able to get a few books done... these should appear shortly on my Etsy shop. Thanx for stopping by to see what is new. I have really enjoyed being able to spend more time in my studio... I find it so theraputic to work with my hands.


Thursday, February 21, 2008
busy bee...
Wow! You all have kept me really busy this week... Thanx! Things have been flying off the shelves at my little Etsy shop. This whole experience has been fun and exciting so far...and it keeps me off the streets...ha ha. Thank you for taking the time to stop by and take a peek at my shop and for those of you who found something that you liked enough to purchase... an extra special Thank you. I hope you enjoy it as much as I enjoyed making it. Well, I am off to spend some quiet time with the kids before sending them off to bed and then it is back to the messy studio for me. Pop back in from time to time to see what's new.
Monday, February 18, 2008
nesting...
I like bird nests and bird houses in general. I don't think this was a realization that came to me in an instant but rather as an observation I made while looking at the art and things that I have chose to surround my self with. I have 8 birdhouses in my house (and I think there are 3 more tucked away somewhere), I have wood cut prints of birdhouses and other bird art (specifically ravens and black birds) and I have collected bird nests over the years. These are a few pics of some of the bird nests that I have around my studio.


My neighbor gave me this nest. He was cleaning out one of his Bluebird houses and found this gem. There is even a hatched egg shell in there.

Several years ago when I was in grad school I did this little piece. The drop spine box opens up to hold a journal and displays this bird nest to tie in the story. The text depicts the story of how the Robin got his red breast. The story in short, goes on to tell how the Robin carried water in his beak to Christ while he was on the cross. The bird sat on his crown of thorns and dropped water into Christ's mouth. Christ's blood was on the thorns and as the little bird perched there doing his good deed the blood stained his chest. To show his gratitude, Christ told the little bird that from now on he and all of descendents would wear a red badge of honor as a sign of his kindness. And that is how the Robin got his red breast.


This is a hummingbird nest. I love this little nest. The tiny root fibers are woven so tightly. What craftsmanship! I took a copy (photo copy of course) of Thoreau's Walden and cut the lines of the text into strips, sprinkled them with walnut dye and wove them into the nest.


Sunday, February 17, 2008
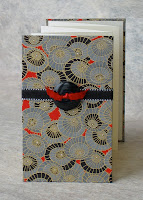
dreamy... (little box that is)
OK... so I am in new camera nirvana. And tonight I am going to DREAM of all the fabulous pictures I will take.

This a fun little box I like to call The Tooth Fairy Special. I haven't made any of these in awhile but they are fun and quaint. The idea behind these tiny boxes is that you put your tooth inside (instead of under your pillow) for the Tooth Fairy and she leaves coins behind. So it is like a little treasure box that your kids can open in the morning to find the prize that their lost tooth has fetched. And of course there is bling... all fairies like bling... which is sure to attract the Tooth Fairy's attention and perhaps encourage her to leave something extra special. Of course they can be used for other things too and are the perfect size for earrings or other small item and make a fabulous presentation for gift giving.
Friday, February 15, 2008
Oh happy day
Well my husband surprised me and came home with a new camera today. It is a Canon something-or-other with entirely too many bells and whistles but I am so excited... now I just have to learn how to use it. I hope to be posting some new pics here and some new items on my Etsy site very soon. On Saturday, I have a fabulous day chasing children, taking pictures, grocery shopping and art making planned... after a cup of coffee and a hair cut of course. A girl has to look her best you know... at least if my hair looks good no one will notice the baby vomit on my sleeve or the snot line... wanna know how tall my children are??? look for the snot line on my clothes.
And for those of you who read blessed and lucky... yes, I will be posting pics of Andrew's new gappy grin too.
Wednesday, February 13, 2008
Whooo hoooo!!!
Yippee!!!
I am so excited!!! Thank you Kim for this prestigious creative blogging honor and my new fancy-schmancy blinkie. And thank you to everyone for popping in to peek at my blog and new Etsy shop. Don't forget to check out Today's Creative Blog to see who Kim features next.
Tuesday, February 12, 2008
bye bye camera
My camera up and died. It has been in failing health for some time now and although it still took great pictures it could only handle about 10-15 pictures before it got tired and powered down...in the prime of its life it could go for several days of heavy use. And the memory card that used to hold a few hundred pics now flashes "full" at about 27 photos. So it was not surprise when yesterday the old girl powered down for good. So we are in the market for a new camera. How ironic that I just set up my Etsy shop and another blog to share photos of the kids with family and my camera decides it is time to call it quits. Uhhhhgggg! So I won't be able to add any new items to my Etsy list for awhile... but check back soon cuz I working on some fun stuff.
Sunday, February 10, 2008
Hey Lady, where'd ya get those boxes?
I often get asked... where do you get your boxes? Well I make them of course. They start out as sheets of binders board that are cut into pieces, glued, sanded and then covered with paper or cloth. I guess I assumed that everyone knew that. Silly me! Each box at the very minimum, is made up of 7 pieces of cut board but usually many more... a base, 4 sides or walls, a lid, and an inner lid... everything else is embellishment. I also cut and cover pieces of board to use as "risers" to add visual interest and some dimension to an otherwise flat lid. So Yes, I build my boxes from scratch, so to speak, and I teach boxmaking too so that others can make boxes too.
Here is a stack of binders board just waiting to become something fabulous.


Here are a few boxes that have been cut and glued and are waiting to be sanded. They are glued up using PVA (poly vinyl acetate) adhesive onto mylar. The PVA doesn't stick to the mylar so when glue is dry the boxes can be pealed off easily (if not for the mylar the boxes would be glued to the table). The next step would be to cover the boxes with paper or cloth... this also requires a series of cuts and folds. I use PVA when covering the boxes with paper or cloth and also for attaching 2 pieces of board (such as when layering a lid).

OK... I usually keep this area a bit more tidy... but this is my board shear. Oh how I love my board shear. It is a huge paper cutter that could slice off my fingers like butter....I use it to cut the binders board used to make my boxes and books. There is a counter weight that makes the blade light as a feather to lift but because I have little ones occasionally in my studio and because the blade is so sharp... I have left the counter weight off. This makes it more difficult to lift the blade but it but it is safer to have in the house this way. This little beauty has a cast iron base and a wooden top and is extremely heavy. When we moved it into the house, we took the top off the base and removed the blades and even then it took 4 guys to get it into the basement.

Here is my little shop of horrors... it is in desperate need of some TLC. I cannot believe that I am actually posting pics of my studio in this condition... I usually try to keep things neat and tidy but obviously it has been some time since this space has known "neat and tidy. I have messy little piles everywhere and I sometimes spend more time digging for things than actually working. This is a great space but I really need to get it organized.

Yes, I work under these conditions


I love these big (there are 2) windows in my studio space that look out into the rest of the basement/play area. We have mats on the floor and a swing and other fun things for the kids. Depending on how well they are getting along... I can watch the play while I work in my studio. You would think that I would get more work done with a set up like this but sadly you are mistaken. The boys don't want mom to "watch" them play they want me to help them fight the forces of evil or push them on the swing or fix the VCR tape that got stuck... So needless to say I usually get more done after they go to bed.

Friday, February 8, 2008


Wednesday, February 6, 2008
God Bless This Abecedarium
While in grad school I did this edition : God Bless This Abecedarium. It is a little ABC book with loose leaf pages in a drop spine box. It is a little edition of 10. The pages combine letterpress, chine cole, blind stamping, foil embossing, photo transfer and of course ... box making and other techniques. My under graduate work primarily consisted of printmaking and drawing so this little edition brought together many of the mediums that I enjoy. I really loved this project and process was really rewarding... and really time comsuming. This was one of my first experiences with letter press and I liked it so much I bought one (actually I just took a letterpress with a damaged trip off the schools hands). I am sad to say that it is still in storage... Pat told me that if we brought it into the house it would be sold with the house (these things are big and very heavy)... so for now it storage it will stay.

The drop spine box is covered in black book cloth and the inside is lined with marbled paper. I marbled the paper myself. Not something that I think I will try again soon.

N is for NAILED, B is for BURNING BUSH and T is for TEMPTATION.
I used masonry nails and attached them with wire to complete the I's in NAILED.
(as in nailed to the cross).

S is for Stigmata.
I did a drawing of the hand and printed it on to the pages and then letterpressed the word STIGMATA. Finally, using my finger, I applied a touch of red printing ink.

V is for Virgin.
I am not sure how clearly you can see this in the photo but the word VIRGIN is blind stamped on white paper. Quite appropriate I think.

Here are a few more of the pages.
Tuesday, February 5, 2008
little accordion books


Monday, February 4, 2008
finding the time
Uhhhggggg! There is just not enough time in the day...there is always something that someone needs and they need it RIGHT NOW! I am itching to work on some more boxes but I just haven't been able to set aside a good chunk of time to get anything done. So I am currently working on smaller projects that can be put down quickly when the natives get restless. I have tons of scrap papers... beautiful, but too small to be of much use for my boxes... so I am making some small books. I can fold the accordion pages and sew signatures while helping Andrew with his homework, Sam is at school and Sean is sleeping (it is a beautiful thing when everyone is happy, content or otherwise occupied). I have been trying to do a handful each day and then when I am ready to get messy in my studio I will have a bunch of projects that I can just jump right in to. High on my priority list is to get some more boxes cut and glued up too.
An inspired list
Not that I need any help creating lists... I actually make lists of lists... but I got this idea from another blog. Here is my list of things that inspire me.
1. negative spaces. (the empty space around objects). I am particularly fond of the the negative space between tree branches.
2. shadows and highlights. Lighting and how light plays off of and around an object can profoundly enhance (both positive and negatively) an object. Sometimes it is not actually the object itself that captures my attention but rather the shadow it casts or the light it reflects.
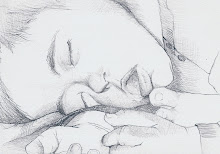
3. my boys. They inspire me to draw more. I love doing quick little sketches of them... especially while they are sleeping.


5. happy mistakes. Sometimes a project does not turn out as planned but that isn't always bad.
6. grids/ repetition . I don't know why... I just like grids and repeating patterns. Things laid out in a grid pattern. I love this piece by Rachel Whiteread (100 UNITS). She cast the the spaces underneath 100 chairs in resin. The forms below are the positive of those spaces. There is something beautiful in the repetition of form.

Rachel Whiteread, 100 units
7. architecture. I love the designs of Frank Lloyd Wright, Charles Rennie Mackintosh and Gothic architecture (cathedrals).
8. simplicity/ minimalism

Donald Judd
9. craftsmanship. I really get inspired by other artist who do what I do... and to it better. There is always room for improvement.
10. nature. I am often inspired by a stone or stick or pattern found in nature and think... that would look great on a box!
to be continued...
Subscribe to:
Posts (Atom)


